|
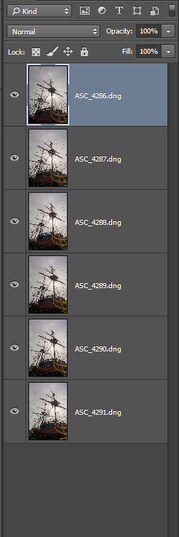
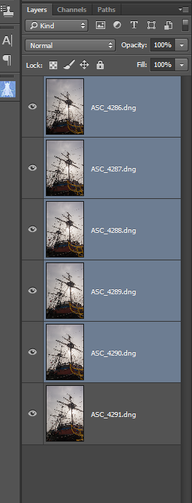
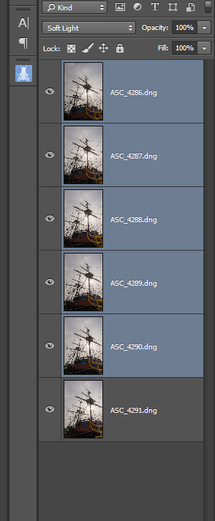
Okay you may not want or have a multiple exposure option in your camera menu system...no problem as I'll show you how to take a set of shots whilst changing your viewpoint gradually and then putting them together. So I've taken six shots of this old galleon in St Malo harbor and moved the camera slightly for each shot. I've auto synced them in Lightroom by clicking on the first image then holding the shift key and clicking on the sixth frame. Any changes I make to the first image will be synced across all 6, I find lens correction of the Nikon 20mm is a must but I'm also looking for a histogram that has no clipping...okay finished faffing??? Now it's a trip across to Photoshop so as the images are still highlighted I right click on one of them and a contextual menu pops up and down the bottom will be one that says 'Open as layers in Photoshop' click it and Lightroom will load these files as a layer stack in Photoshop....the only tricksy bit now is to select the top layer and hold the shift key whilst clicking the layer above the bottom layer in the stack ...they should all be selected bar the bottom layer...go to the Blend mode drop down box and choose either Overlay or Soft Light...and kerching all done.... like this. You might want to have a play in Photoshop or just flatten the layers and use the Save option which should load the image from Photoshop straight back into Lightroom where you can apply any changes you want there so here is one below that was all done in camera...6 shots multiple in Camera with a touch of EV to slightly underexpose and a lens correction in Lightroom with the merest whiff of faffery...give it a Go!!
0 Comments
Leave a Reply. |
What's all this then????An unyeilding torrent of Photo babbel full of unconfirmed facts and manufactured photo drivel.. take from it what you like, it won't change the world but may leave you feeling nauseous... Categories
All
|
- Home
- Latest Work
- Bugle Blog
-
Back History
- 2022 >
- 2021 >
- 2019 >
- Les Fleurs
- By the Sea
- Manchester and the Quays
- Bonnets
- Tours de Bretagne
- Vallee des Saintes 2017
- Maison du Fromage
- Metal Men-Portraits from Another Place.
- Solute
- Shadowland
- Tree Line
- des images fixes
- Out to Sea.
- Victoria Baths
- Scout Moor
- Manchester
- Bord de la Mer
- Stockport Market
- Locqueric Bay
- Metropolitan Cathedral Mono
- Glasgow 2014
- Jeux
- Beetle Juice.
- Manchester Wheel
- New Mono 2016- >
- Galleries 2013 >
- Breton Jardin
- Barr Village
- London 2020
- Old Tractor Portraits.
- Road to the Isles
- Crown of Thorns >
- Chateaux Trevarez


 RSS Feed